Thursday, September 30, 2010

Felted Pumpkin and Paper Treats

I have had this pattern for a knitted and felted pumpkin on my to-do list for a while, and when I joined a Halloween Goodie Bag swap on MJF it seemed like the perfect addition. While the knitting went easy peasy, I had a bit of difficulty with the felting. I didn't feel like paying my landlord for several loads of wash to get it all felted, and so I thought I'd do it by hand. Mph! The stitching all stretched out the second it hit the first batch of water. I sort of had a hard time keeping the shaping as it began to felt, though the Lion brand yarn I used did felt well. But the plastic bags called for to stuff the pumpkin while felting blobbed about, misshaping the pumpkin, and the yarn that was supposed to define the sections sort of drifted. I was none too happy!! I finally just took the stuffing out and finished felting empty. Then when it was dry (several days later, sheesh!), I took a matching color thread and wrapped it around the section divisions. I think the final effect is good but I really wonder if the machine felting works better. Still, what a cute little felted joy:

Felted Pumpkin

Besides the banner I previously posted and the felted pumpkin, I also made a few candy containers out of cardstock using my cricut and Make The Cut. The felted pumpkin was tucked snug in a felt bag from the dollar store, and a store bought metal Halloween ornament was placed in a cute witch box I got last year on clearance. A haunted house card topped it all off:

Halloween Goodie Bag

Wednesday, September 29, 2010

Halloween Banner

Halloween Banner

Banners seem to be all the rage right now in the papercrafting world, so I decided it was high time I joined the bandwagon. I made my first banner rather piecemeal, as at first I wasn't planning on a banner. Rather, I was just cutting characters from my new Mini Monsters Cricut cartridge for play. I love this one! There are cute monsters as well as a lot of Halloween themed characters. I still haven't made the 3-D haunted house - I read one blogger took 2 hours to make and assemble it! But that's coming as well.

So, I had all these paper piecings and was thinking I would make oversized tags with them. But the tags looked too big, and then I realized they would make a cute banner! I cut the basic banner shape using the Country Life Cricut cartridge, because I have it right here and was being too lazy to make a shape myself lol. I like the scalloped edge the cart gives you. For the inside triangle, I just used my paper trimmer to cut a set of matching triangles from printed papers. Then I mounted the monster characters on top and threaded the whole shebang on cute Halloween ribbon. I really like how it came out, and will be making more of these. I am thinking I need one for every holiday, yes?

Since I decided to send this banner as part of a Halloween Goodie Bag swap on MJF, I didn't want to tie it up to photograph it. These pics are crummy but you get the idea. At first I wanted to make flower rosettes under the characters, but couldn't figure out how to ship the resultant 3-D banner pieces safely with all the other goodie bag contents, so I stuck with flat this time. My next banner will be for either me or my cousin's boys, both local, so I think I will try rosettes with that one.

Here are close-ups to see what the individual flags look like much better - just click on the pics to get a better look:

Banner Closeup
Banner Closeup 2
Banner Closeup 3

Tuesday, September 28, 2010

Tea Time

I have been a tea lover for decades. And what better accoutrement for tea than a lovely tea towel? These were made on huck toweling with a 14 count Aida border. The designs are done in Swedish weaving, also called huck embroidery, and are modifications of patterns I found in Huck Adventures. Huck embroidery works by passing the embroidery threads under floats on the top of the fabric; the floss never travels to the back of the fabric. It can create lovely geometric designs. I love how these turned out! I made them for yes, yet another MJF swap.

HuckTeaTowels

Sunday, September 19, 2010

Bookmarks, Baby

It's really fun to swap bookmarks. They can be as detailed or as simple as you wish. They can be made of paper, fabric, ribbon, raffia, thin plastic or acetate, you name it. A bookmark can be cut, glued, layered, stamped, sewn, woven, knit, crocheted, tatted, and probably other things I cannot even imagine at the moment. And the finished product fits into a simple envelope, no extra postage needed. Besides, we could all use a bit more reading in our lives, right? Consider doing a bookmark swap, it's fun!

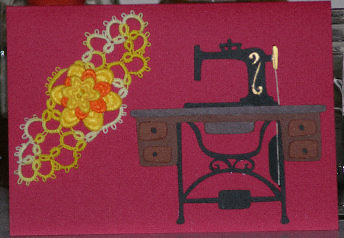
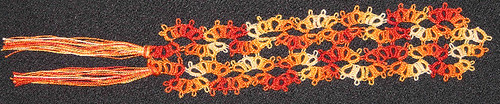
Here's a tatted bookmark I made for Angie in WA. I find needle tatting easy and restive but weaving in the ends is sheer hell, let me tell you. And this one had a LOT of ends!! Since you use a needle the same thickness as the thread, there just isn't room in there for a couple passes of thread! Despite the finishing aspect, I did enjoy making this one.

TattedMidnightBookmark

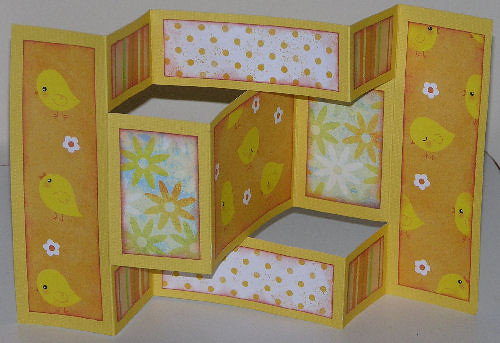
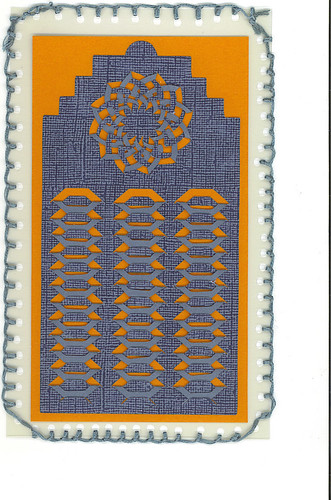
The next one went to Mary E. The main cardstock was cut on my Cricut E using a file from Wanda . I love the folded elements and she has a few other files like that. After all the folds were made with the cuts, I backed with a high contrast paper, and finished by whip stitching two sheets of transparencies together with embroidery floss. I think it came out well:

folded tag bookmark for Anne E.

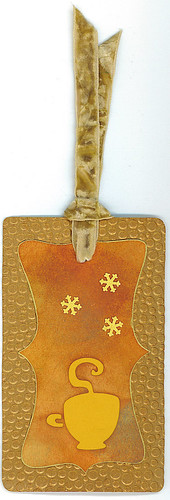
My next bookmark was made with wishful thoughts of winter to come. Of course, by the time it actually gets here, I will be wishing for summer no doubt. I clearly live in the wrong part of the country! I want long springs and autumns, but instead I get severe summers and winters. Ah well. This one has an embossed backing, cut out teacup with a layer to highlight the cutout, distress inked paper layering, gold leafing around the inner edge, and a velvet ribbon. It was missing something so I found the perfect snowflakes: they are actually the negative fallout from a snowflake border punch but they work perfect here:

winterBookmark

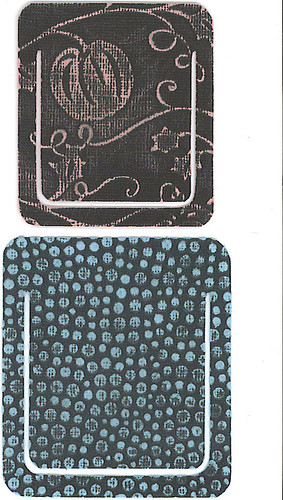
Finally, I leave you with a couple real simple bookmarks. Again, these were cut on my Cricut, but I am sad to say I do not know where the file came from. Both were cut from Coredinations cardstock, embossed with the Cuttlebug, and sanded to bring out the design.

paperbookmarks

Monday, September 13, 2010

MJF Mailart

I try not to post pics of anything I have made for swaps until after I know my partner has received their goodies, and then I forget to post! So my next few posts will be catch up. I have been very active on the MaryJane Farms Farmgirl Connection forum swaps. One of my regular swaps is a monthly mail art swap. Each month I send out a piece of mail art to a different farmgirl, and in turn received one of my own from a different farmgirl as well! Here are some of the cards I have sent out for the mail art swaps:

AugMailArtSent
August Mail Art sent to Laura In IL - the treadle belt is actual thread and the base of the design on the left is a partially finished pattern from a tatted bookmark, topped with felt flower buttons

July 2010
July Mail Art sent to Debra - I just love these trifold cards!

apron Card
May Mail Art sent to Meg in ID - a nod to her mom's apron evangelism LOL